In order to experiment with artificial intelligence, I need a platform to play with, therefore, I have hacked a Bigtrak. This entry is a description of my journey so far.
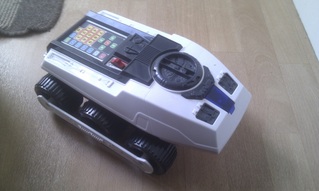
The Bigtrak is a children's toy which can be programmed, via a keypad, to drive around and shoot things with its 'photon laser'. Inside, there is a main circuit board, 3xD cell compartment (4.5v), LED (Photon Laser), speaker and twin gear box (motors circa 3v, no-load = 150mA, loaded = 500mA ) (image right).
The Plan
After working with the Nanode RFX for some time, I decided that the Arduino Uno would be more appropriate for this project. Therefore, after purchasing the Uno, I looked for an appropriate motor controller. I needed something that could handle a peak of 500mA and found, curtsy of the Raspberry PI forum, the "Dual H Bridge DC Stepper Motor Drive Controller Board Module Arduino L298N #236" (long name but should be searchable). After around 20 minutes I had a working circuit (see video).
The Bigtrak is a children's toy which can be programmed, via a keypad, to drive around and shoot things with its 'photon laser'. Inside, there is a main circuit board, 3xD cell compartment (4.5v), LED (Photon Laser), speaker and twin gear box (motors circa 3v, no-load = 150mA, loaded = 500mA ) (image right).
The Plan
- Remove circuit board and keypad then replace with Arduino Uno and motor controller.
Test its roaming ability with basic program.
Install sensors. Options including, but not limited to: ultra sonic, light, reflective surface, impact, tilt and sound.
Install actuators. Options include, but are not limited to: stepper motor (360 degree rotation of ultra sonic sensor) and LED.
Design program to allow the Bigtrak to behave in response to environmental stimulus.
After working with the Nanode RFX for some time, I decided that the Arduino Uno would be more appropriate for this project. Therefore, after purchasing the Uno, I looked for an appropriate motor controller. I needed something that could handle a peak of 500mA and found, curtsy of the Raspberry PI forum, the "Dual H Bridge DC Stepper Motor Drive Controller Board Module Arduino L298N #236" (long name but should be searchable). After around 20 minutes I had a working circuit (see video).
| The circuit has two power sources, 9v to power the Arduino and in turn the motor controller and 4.5v to power the motors. The motors used in the video are not from the Bigtrak, I am using these just for test purposes. Next step, install motor controller and Arduino. All comments, suggestions and feedback welcomed. | |
 RSS Feed
